I love my eeePC, it has changed the way I work. I carry it around with me everywhere scarcely ever noticing its weight allowing me to do work almost anywhere! It's powerful enough for testing, enough hard drive space for my tools, runs of my simulation and even some music. The only downside when I first got it: the antennas weren't powerful enough to pick up those elusive wifi signals. Although, after cracking the magic device open I found that the internal antennas were hooked up using U.FL connection. And so the hacking began!
[picture of wireless module to come in very near future]
Above you can see the actual wifi module from the expansion bay (this is the removable region in the center of the bottom of the laptop). This led me to buy a U.FL to RP-SMA cabel from hyperlinktech (http://www.hyperlinktech.com/item.aspx?id=1123) as seen below:


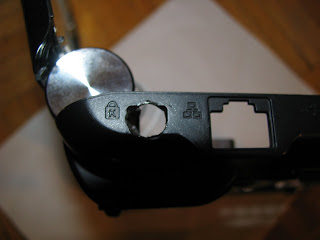
I chose RP-SMA for the outside connection because I already had an RP SMA antenna from an old router and it seems to be the most popular kind (so getting new antennas shouldn't be too much of a problem). I also bought a 9dB 2.4GHz antenna from the same store. 2.4GHz is the frequency of wireless internet (802.11a/b/n). In order to make everything fit into the eee, I had to sand the stopper almost all the way down until it looks like:

In order to make this hack a nice clean one, I decided to completely gut out the computer so I could put everything back where I wanted to. There are MANY screws so make sure to keep everything organized. I normally take a sheet of paper and put the screws on different parts of it while marking in marker where those screws should be (and how many of them I took out!). I also took out the screen because I was going to machine the hole, but I later realized it was easy enough to do at home. Here's a beauty shot of everything dismantled:

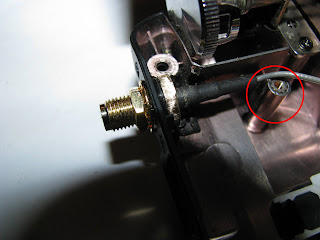
I decided to have the RP SMA connection come out of the "lock" region of the case (right behind the eth0 port). So, I had to make sure that the wire didn't block or bend the motherboard (scary thought! one crack and you have transformed your eeepc into a nice paper weight!). So, I drilled the hole for the connection making sure that it's center was .5mm below the stand of the motherboard (circled in red). To make the hole i used a standard dremel tool outfitted with a 1/8" drill bit.


With that completed I snaked the wire underneath where the motherboard sits. I now plugged the cable to the wifi module, unplugging one of the internal antennas (I recommend doing this before remounting everything as it takes a good amount of force. I even detached the wifi module to make sure there'd be no damage to the motherboard). Once everything is hooked up, it should look like this:


This has been a tremendous gain! The 3dB antenna fits nicely in the carrying case (and so does the eee even with the added width) and the 9dB fits nicely in my backpack. Below is a comparison between only internal antennas, external mod without any antenna and finally external mod with 3dB antenna using `iwlist wifi0 scanning`
#before
fiber@mercury:~$ cat wireless.before
 Cell 01 - Address: 00:1E:58:40:6D:8F
           ESSID:"telepathy"
           Mode:Managed
           Channel:11
           Quality:100/100  Signal level:-31 dBm  Noise level:-81 dBm
#after without antenna
fiber@mercury:~$ cat wireless.afternoext
 Cell 01 - Address: 00:1E:58:40:6D:8F
           ESSID:"telepathy"
           Mode:Managed
           Channel:11
           Quality:65/100  Signal level:-64 dBm  Noise level:-81 dBm
#after with 3dB antenna
fiber@mercury:~$ cat wireless.after3db
 Cell 01 - Address: 00:1E:58:40:6D:8F
           ESSID:"telepathy"
           Mode:Managed
           Channel:11
           Quality:100/100  Signal level:-29 dBm  Noise level:-81 dBm
30% gain with a cheap antenna I just had lying around. I'll post some stats on the 9dB antenna once I am in a controllable enough area (ie: home). Remember, dBm work on the log base 10 scale, so every unit change in dB is a factor of 10 change in strength.
So tell me how this mod works for you or if there are any points that I didn't clearly explain! Happy Hacking!


So you've gone from 100/100 from before to 100/100 after ?
ReplyDeleteLook at the signal level... from -31dB to -29dB with a cheap 3dB antenna....
ReplyDeletefusion device? let's compete with ITER to see who can get it to work first!
ReplyDeleteit looks so clean! nice dremel work.
ReplyDeleteToo good for a good old-fashioned cantenna?
ReplyDeleteIts ideal for scanning networks with external antenna(feeder+Dish or panels or grids).
ReplyDeleteThank you!