Monday, December 22, 2008

eeePC 901 Antenna Mod

Well, after the treachery of exams and then the confusing transition into vacation I finally think it's time to update! Well, I've done quite a lot: everything seems ready for the final version of the 3D whiteboard along with the construction of the 3D display. Furthermore everything is in motion to begin the fusion device first semester of the next academic year (damn you Darryl for leaving to Singapore!). But, in the realm of the actual rather than the theoretical, I have modded my eeePC 901 to support external antennas (for only $20).


I love my eeePC, it has changed the way I work. I carry it around with me everywhere scarcely ever noticing its weight allowing me to do work almost anywhere! It's powerful enough for testing, enough hard drive space for my tools, runs of my simulation and even some music. The only downside when I first got it: the antennas weren't powerful enough to pick up those elusive wifi signals. Although, after cracking the magic device open I found that the internal antennas were hooked up using U.FL connection. And so the hacking began!

[picture of wireless module to come in very near future]

Above you can see the actual wifi module from the expansion bay (this is the removable region in the center of the bottom of the laptop). This led me to buy a U.FL to RP-SMA cabel from hyperlinktech (http://www.hyperlinktech.com/item.aspx?id=1123) as seen below:


I chose RP-SMA for the outside connection because I already had an RP SMA antenna from an old router and it seems to be the most popular kind (so getting new antennas shouldn't be too much of a problem). I also bought a 9dB 2.4GHz antenna from the same store. 2.4GHz is the frequency of wireless internet (802.11a/b/n). In order to make everything fit into the eee, I had to sand the stopper almost all the way down until it looks like:


In order to make this hack a nice clean one, I decided to completely gut out the computer so I could put everything back where I wanted to. There are MANY screws so make sure to keep everything organized. I normally take a sheet of paper and put the screws on different parts of it while marking in marker where those screws should be (and how many of them I took out!). I also took out the screen because I was going to machine the hole, but I later realized it was easy enough to do at home. Here's a beauty shot of everything dismantled:


I decided to have the RP SMA connection come out of the "lock" region of the case (right behind the eth0 port). So, I had to make sure that the wire didn't block or bend the motherboard (scary thought! one crack and you have transformed your eeepc into a nice paper weight!). So, I drilled the hole for the connection making sure that it's center was .5mm below the stand of the motherboard (circled in red). To make the hole i used a standard dremel tool outfitted with a 1/8" drill bit.
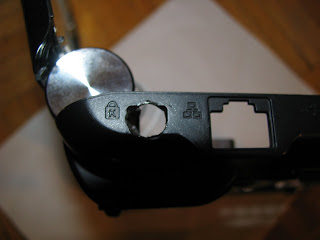
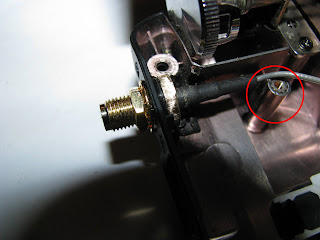


With that completed I snaked the wire underneath where the motherboard sits. I now plugged the cable to the wifi module, unplugging one of the internal antennas (I recommend doing this before remounting everything as it takes a good amount of force. I even detached the wifi module to make sure there'd be no damage to the motherboard). Once everything is hooked up, it should look like this:


This has been a tremendous gain! The 3dB antenna fits nicely in the carrying case (and so does the eee even with the added width) and the 9dB fits nicely in my backpack. Below is a comparison between only internal antennas, external mod without any antenna and finally external mod with 3dB antenna using `iwlist wifi0 scanning`


#before
fiber@mercury:~$ cat wireless.before
Cell 01 - Address: 00:1E:58:40:6D:8F
ESSID:"telepathy"
Mode:Managed
Channel:11
Quality:100/100 Signal level:-31 dBm Noise level:-81 dBm
#after without antenna
fiber@mercury:~$ cat wireless.afternoext
Cell 01 - Address: 00:1E:58:40:6D:8F
ESSID:"telepathy"
Mode:Managed
Channel:11
Quality:65/100 Signal level:-64 dBm Noise level:-81 dBm
#after with 3dB antenna
fiber@mercury:~$ cat wireless.after3db
Cell 01 - Address: 00:1E:58:40:6D:8F
ESSID:"telepathy"
Mode:Managed
Channel:11
Quality:100/100 Signal level:-29 dBm Noise level:-81 dBm


30% gain with a cheap antenna I just had lying around. I'll post some stats on the 9dB antenna once I am in a controllable enough area (ie: home). Remember, dBm work on the log base 10 scale, so every unit change in dB is a factor of 10 change in strength.

So tell me how this mod works for you or if there are any points that I didn't clearly explain! Happy Hacking!

Tuesday, November 18, 2008

new project

Well, it's taking longer than I expected for the parts for my most recent project to come in. I'm waiting for some wireless pigtails (U.FL to RP-SMA) so that my EEE PC has an external antenna (an easy hack, but one I haven't seen any documentation online for).

In the meantime, here's an old video I made a while ago playing with non-Newtonian fluids. This is really easy to make (just saturate water with corn starch) and very fun! Non-Newtonian fluids are fluids whose viscosity is dependant on the applied strain. So, the strain from the speaker constantly hitting the fluid causes it to become much more viscous to the point of appearing solid. This causes all sorts of fun! In this video I played a 100hz sin wave through the speaker. I did this later as a demonstration at the Dragon Academy and I have to say it was a great success, I recommend it for any teachers or demonstrators. Hope everyone enjoys!


Tuesday, November 4, 2008

obama fever

OBAMA WON! Truly a day to remember. So, in the spirit of science funding not being slashed to death I am going to release one of my first python scripts that downloads all images off of the NASA Astronomy Picture of the Day (apod).

I tried keeping the code commented so that it could also serve as a good learning tool. One thing I'd like to include is some way of saving the description of the image. This could be done by saving it into a text file with the same filename as the image, but I suspect there is a better way (using ImageMagick to embed the information?). If you have an idea or preference, post a comment! So, here it goes:


#!/bin/env python
#
# Copyright 2008 Michael Gorelick
#
# This program is free software: you can redistribute it and/or modify
# it under the terms of the GNU General Public License as published by
# the Free Software Foundation, either version 3 of the License, or
# (at your option) any later version.
#
# This program is distributed in the hope that it will be useful,
# but WITHOUT ANY WARRANTY; without even the implied warranty of
# MERCHANTABILITY or FITNESS FOR A PARTICULAR PURPOSE. See the
# GNU General Public License for more details.
#
# You should have received a copy of the GNU General Public License
# along with this program. If not, see:
# http://www.gnu.org/licenses/gpl.html.

import re, urllib, sys, os

### Check/Do Help
help = """NASA Image Getter - Michael G. (GPL 2008)
./%s [-h] [imagepath]
imagepath - path to save images
-h, --help - this help"""%sys.argv[0]

if "-h" in sys.argv or "--help" in sys.argv:
exit(help)
elif len(sys.argv) == 1:
print "Not enough program arguments"
exit(help)

### CONFIG
allowedChars = '[-a-zA-Z0-9*:\'.,&!?\(\)//\n"+;_ ]'
allowedFiles = '[jpg|jpeg|png|gif|mov|avi|mpeg|mpg]'
url = "http://antwrp.gsfc.nasa.gov/apod/archivepix.html"
pbarwidth = 80
try:
imagePath = sys.argv[1]
os.makedirs(imagePath)
except Exception, e:
#errno == 17 means the directory already exists.
if e.errno != 17:
exit(e)
print "Saving images to %s"%imagePath

##############################################
## This section looks for links to image pages
print "Searching for image pages in", url
html = urllib.urlopen(url).read()
pagePattern = re.compile('([0-9]{6}).html">(' + allowedChars + '*)')
pages = pagePattern.findall(html)
totalpages = len(pages)
print "Found", totalpages, "image pages."

#############################################
## Now we go to the pages and extract a list
## of images and download
try:
alreadyHave = open(imagePath + "/tracker.log").readlines()
except IOError, e:
alreadyHave = ""
totalhave = len(alreadyHave)
try:
tracker = open(imagePath + "/tracker.log", 'a+')
except IOError, e:
exit(e)

base = url[0:url.rfind('/')]
imagePattern = re.compile('<a href="image/(' + allowedChars + '*.' + \
allowedFiles + ')"', re.IGNORECASE)
sanitizePattern = re.compile('[//\n\r\t]')
imageGet = urllib.URLopener()

for i, page in enumerate(pages):
try:
if page[0]+"\n" not in alreadyHave:
#Extract information from image page
title = sanitizePattern.sub("", page[1])
currentpage = base + "/ap" + page[0] + ".html"
print "Getting " + title
content = urllib.urlopen(currentpage).read()
image = imagePattern.findall(content)

#Parse data
filename = imagePath + "/" + (title + \
image[0][image[0].rfind('.'):]).replace(" ","_")
print "\tFilename: " + filename
url = base + "/image/" + image[0]
print "\tURL: " + url

print "\n[" + "="*(pbarwidth*(i-totalhave)/(totalpages-totalhave)) \
+"@"+"="*(pbarwidth*(i-totalpages)/(totalhave-totalpages)-1)+"]",
sys.stdout.flush()

#Download
imageGet.retrieve(url, filename)
tracker.write(page[0] + "\n")

print "\r" + " "*(pbarwidth+2),"\r",
sys.stdout.flush()
except IndexError, e:
print "\tImage not found\n"
except IOError, e:
print "\t404 Error\n"

tracker.close()
print "Done"

Monday, November 3, 2008

Distractions

Well, exams are finally done but I am still contending with all the work I had to put off. In the works is a post on the topic of conscience and the release of my mac remote code. For now, I will distract everyone with an old youtube video of mine: exploding flint (well, actually ferrocium)


The video pretty much explains itself. It is a nice little demo on the properties of ferrocium. In the end, this stability (or lack thereof) is why it proves to be so useful in lighters. Enjoy!

Sunday, October 26, 2008

failed telescope night

So, after a while spent getting my telescope aligned (and, of course, staring at M41 and M42 for a while), the clouds came in before I could get the camera ready. When I was done cursing the clouds and the cold I had been sitting in, I decided to take pictures of Toronto to gauge the camera.

I was using my 8" Celestron (f#=10, focal length=2032 mm). It's a great telescope although it takes a magical touch to get aligned.

This is the main picture of interest: the symbol of BMO on top of First Canadian Place (which is 2580m away from my balcony). From my calculations, the symbol is 6m tall which means I'm capturing about .1332° or 2.32e-3rad of the sky! (I got this number by doing [; 2\cdot tan^{-1}(\frac{6/2}{2580}) ;])


By the way, the picture of the moon I took before was with my astroscan (f#=4.1, focal length=445cm). It's a great telescope to bring around and it's really quick to get set up and start observing, although the optics aren't that great which leads to a lot of artifacts. Also, I like the tactility that comes with manually aiming the beast.

While I was first testing the camera I took the following picture from 37m away:
Since my camera is 9.5cm tall and it takes up 46.1% of the height and 34.6% of the width of the image we can get... (5.563e-3, 7.413e-3)radians = (.318,.424)degrees=(height,width) degrees!

So, if we take the differences in f# into account, both measurements agree! *phew*, well at least now I can say tonight wasn't a waste.

Saturday, October 25, 2008

oscilloscope!

So, I was at active surplus (with trusted, albeit slightly slow, sidekick Darryl) looking for parts for the fusor or the 3D display when I ran into this amazing old school oscilloscope. After quickly brainstorming some reason I could justify buying this beautiful piece of science equipment (or history depending on your view) I got it! The justification is actually quite good: instead of buying a Geiger counter, we can use activated aluminum and a charged plate (neutron hits the aluminum, shoots of an electron which gets captured by the plate which turns into a signal that the oscilloscope can see) to verify fusion is happening.

Anyways, here's a little video of the piece in action: hooked up to my speakers playing Roads by Portishead. Sorry about the video quality... also the cameras refresh rate doesn't do justice to the display.


As for the fusor route, we are going to get florescent transformers (~20,000V at a couple miliamps) for power, and hopefully e-bay will have the correct vacuum pump (it's hard to find ones that go down to 5microns). As for the vacuum container... we might just have to get one custom made. This is one piece that I don't really want to try building myself since it's the only part of the project that could seriously maim us.

Oh, and stay tuned... tomorrow I'm going to post a video I did a while ago about getting a cool explosion using ferrocium which you can get out of a common lighter!

Friday, October 24, 2008

panoramas

So, a little bit ago I got a new camera (well, I guess it's no longer new) so I thought, since I couldn't afford any great lenses, I'd get acquainted with good post-processing. First thing to attend to was mending a mosaic of pictures together into one seamless picture. So, bellow is my evolution in trying to get a good panorama:

Balcony View:
This one didn't look too bad. I was lucky that lighting conditions didn't change too much as I took all the photos.


Night Panorama:
I was rushed. As a result I didn't get enough pictures to get good perspective. Also, you can see the lighting conditions changed drastically as I took the pictures.


Dawn Panorama:
That's not change, that's more of the same! I took these pictures fast enough to have some resemblance to homogeneous lighting, even though it's homogeneously dark.


Toronto Through a fishbowl:
This one turned out great! I took more than enough pictures and did it quickly. You can see a few artifacts from mending (check the train tracks), but all in all it turned out great. In fact, there are parts of the image that were cut out of all the photos that I had to reconstruct completely using photoshop (special prize to whoever can guess where). If you want to see a full resolution (17mb, 5989x4058) version, go here.


Sunset:
So, I was doing work and I look out the window and I see a rainbow AND the moon. So, I quickly try to get as many pictures as I can for a panorama. Didn't turn out exactly how I wanted, but it is still quite cool!


For all these images, I loaded them into photoshop and used the automated function "photomerge". Once the images were merged I blended the edges and applied any sort of photoshop magic I could to make the image seem smooth. This was hard in some cases (ie: in the last image, sunrise, you can see a drastic color change in the sky).

These skills are actually quite useful for many things, especially the telescope camera. I used basically the same technique to make the moon picture from the telescope camera (although I probably should have used a more stack oriented program... that's what the future is for!).

So, feel free to download all these images, just remember they are all licenced under the Creative Commons (Attribution-Noncommercial-Share Alike 2.5 Canada).

Thursday, October 23, 2008

Projects to come

I also want to use this blog as a place to write down the projects I want to try doing on top of talking about the ones I've already completed. So, here's a list of what's coming up and what I would like to come up:

In the works:
  • 3D Whiteboard (almost done!)
  • 3D Volumetric Display (anyone want to donate an optical bench or some mirrors? :) (with help from Darryl)
  • Fusor (anyone know how to make a cheap vacuum chamber?) (together with Darryl)
  • python Hobbyist Observer Tool (phot?, almost done... but not ready for the public yet)
  • pyremote (python tool set for the mac remote... basically done, I'm just making some modules ftw)
To come:
  • Ferrofluid (I'm doing this one for the kids at a local highschool)
  • Hologram of Saturn (well, I have the camera, now I just need some clear nights!) (Helping Darryl)
  • Micron sized tractor beam! (too cool to say no)
  • Tape as an x-ray source (again, vacuum chamber?)

Materials Wishlist:
  • Vacuum Pump
  • Vacuum Chamber! (or at least the materials to make one)
  • NeHe Laser
  • Heavy Water (harder to get in Canada than I thought... united nuclear has some if someone wouldn't mind bringing me some back from the US)
  • Microscope
  • Oscilloscope
  • Wave Generator
  • LCD Projector (3d (whiteboard|display))
  • That paper thing... what's it called?... money?
On top of those personal projects, I'm also working with Chris Matzner on protostellar outflow-driven turbulence. To put shortly, we are basically seeing if jet's shot out by young stars, protostars, can cause a feedback effect and, by the creation of super-sonic turbulence, slow down star formation rates. I'll put a post about that sooner rather than later... I think I will start a one post per day rule to get this thing going.

Wednesday, October 22, 2008

Telescope Camera HOWTO v1


Alright, well... after many failed attempts to start a blog I will, instead of starting and ending with an introductory post, get right into it. This will be kind of odd as I've already completed this project in full, but soon i'm going to be doing it again, so stay tuned for version two of this howto!

Anyways, I've always wanted a camera for my telescope but they were always too damn expensive! So, I did what any hacker would do: made my own. The good thing about something like this is that it can be used for any kind of optical system... in fact I will be making one for a microscope soon (and be using properly milled pieces).

So, for this project you'll need:
  1. A webcam (any kind will do, I got a cheap $8 logitec express from canada computers)
  2. Some sort of metal case. It should have at least an internal volume of 2.5x5x3.5cm (might be different depending on what webcam you get)
  3. Computer fan with heat sink (see image)
  4. Camera film tube.
(Total cost: ~$20)

And now to begin the fun! Find out how to open the webcam and do so. For my webcam there was a screw covered by a small plastic cap that held the whole unit together. You can always just smash it apart, but you don't want to destroy the delicate CCD or the circuitry!

Once open, disconnect the mic (you might want to keep it for later, it became really useful in my assembly) and take the circuitry out of the casing. Make sure the pins on the board for the mic are stowed away, some cameras are already quite compact (in the image below I had to fold the pins down, making sure not to touch anything else). Now take the lens off of the CCD (it unscrews). Be careful because you don't want the CCD to get dirty! You'll see that there is still a plastic piece where the lens used to be that is screwed onto the board (I'll call this the lens holder). Screw this off and break the glass off of it! This glass is an infrared filter and we don't want it. Make sure that everything is clean and screw this piece back on. Now you have a visible+infrared camera, but we want more!

Also, a good tip is to take the lens and glue something long to it... then you can use this as a lens cap so the CCD doesn't get dirty when you store it. Save this step for last so you can see what would best serve your needs.

Now, look at the main cable that connects the USB to the circuit board... you need to identify the ground and power. Voltmeters are useful for this (just plug in the USB cable and check where the voltage flows). Remember where this is for future reference.

Let's take care of the casing for now. First, decide what you are going to use as the front and back of the case. Screw the fan/heat sink securely to the back of the case. You want to make sure that it is secure so that you don't have any excess vibrations. Next, drill a hole in the front the size of the circle of the lens holder from before. This is where the CCD is going! Also, figure out how you want the wires to come out of the case... I drilled a hole in the side and had all the wires (USB+power to the fan) coming out of it. And finally, take that film canister and cut the base off so it becomes just a tube. Glue the lip side down onto the case so that it is centered on the hole for the CCD. I recommend using epoxy or something that gives a bit... more rigid glues (super glue and the like) seem to chip off after extensive use with things like this. And now the case is ready... almost done!

Now you want to get all the wires through the hole in the case you prepared. Solder the wires for the fan onto the correct parts of the USB wire (I found it useful to branch off the wires coming off the CCD board using the wires from the microphone so I had more room to do my work). Before reattaching the USB wires to the CCD board, apply some glue to the outside of the lens holder (being extra careful not to get any on the ccd... this is how i ruined my first CCD) and get it securely fitted into the hole in the case. Now, the final step: attach the usb cable and close the case up!

You are finally ready to take pictures! Use whatever webcam program you prefer. I personally use a script I made in python that uses openCV to control the webcam and find the FWHM (full width half maximum) of a selected region so you know everything is in focus. In a later post I will release this code! For now I'll leave you with a picture of the moon I took while testing this unit. I used gqcam to take the pictures and photoshop to put them together. They were taken off my 4.5" Astroscan telescope (not the best... in fact most distortion comes from the antique optics in the giant red beast, but when it clears up I'll take/post some pictures with my 8" Celestron!).

Hope everyone enjoyed this and please post pictures you take with the camera here! Oh, and if you have any question, just post a comment.